this is all you need http://apps.evozi.com/apk-downloader. Try out the link and download your apk direct from Google play on you PC.
Monday, 9 June 2014
Friday, 23 May 2014
Resetting your NOKIA phone with a security code:
It's simple and dependent on the model of you nokia phone. Check out this methods;
Method One
- Press the unlock key and you wil see "SECURITY CODE"
- Press the red button then dial 112 and the phone will write "ATTEMPTING EMERGENCY CALL"
- Wait for 5seconds and end the cal rush to the menu immediately the menu will open bt the phone will lock again bt just keep "DAILING AND ENDING" until you go to to settings then navigate with your direction then open phone setting just go to auto key guard and select "ON" and put it to any time of ur choice,has for me i use 02:30. Then the phone will automatically unlock.
- N:B=AFTER THE PHONE AUTOMATICALLY UNLOCK DON'T PRESS THE RED BUTTON JUST PRESS UR BACK BUTTON THEN NAVIGATE TO ANY OF THE MENU YOU LIKE
Method Two
- Take the phone locked with security code
- Press and hold the unlock button for a while without releasing it.
- The phone will display now press * quickly press the star button and the phone will be unlocked
Method Three
You will need your phone's serial / IMEI number
- Go to www.unlockitfree.com
- When the page loads, select, free remote master code
- In the area provided for imei/serial number, insert the serial/imei number of the phone.
- Click on generate.
Once done, a number will be generated, that's the master code for the phone, copy and keep the number. When ever that particular phone is locked with security code and you want to unlock it, even though you don't know the phone's security code, just enter that number, i.e. Master code and it'll be unlocked!
- When the phone has been locked, press the normal unlock key and star
- 112 and 911 are emergency phone numbers. Enter either 112 or 911 in the security code password field. Next, click the call, end and menu keys in succession repeatedly
- Phone will unlock.
- For this trick to be effective, you must be very fast while clicking the buttons; don’t wait for the phone to display “Attempting emergency call” before clicking the end and menu keys in succession.
Note
that once you’ve unlocked the phone this way; the phone no longer locks
when you press the usual “menu” and “*” keys (except it’s switched
off). To re-lock the phone; type either 112 or 911 on the home screen,
then click the call and end keys successively.
Tip: Try 5-6 times if you were unsuccessful in bypassing the security code. (Be quick in pressing the keys)
{Tested On: Nokia X2-02, C1-01, C2-01, E63, Asha 305 and Asha 200}.
failed to work on Nokia 5130c and 2700c.
Test yourself on Your Phone and Comment if you were successful in doing that.
HAVE FUN.. HUH
Linux Based OS
Things to do before you start
First of all, you should install some proprietary codecs (audio/video/flash)and plugins (e.g Adobe flash player) and packages. These packages includes -
Adobe Flash Player plugin for browser
proprietary audio/video codecs (don’t you want to play mp3 songs?)
java runtime environment etc
So open terminal (Ctrl+Alt+t) and execute the command -
sudo apt-get install ubuntu-restricted-extras
If you want to play encrypted DVD then execute the following commands -
sudo apt-get install libdvdread4
sudo /usr/share/doc/libdvdread4/install-css.sh
=======================================================================================================================================================
#2. Install VLC Player
vlc player on linux-mint
VLC is the most popular – ‘all in one’ open source media player, specially good for playing various video files. VLC supports variety of input formtas including – flv, avi, ogg, mp4, mp3, wmv, wma. mkv, ogm etc. To install VLC media player in Linux Mint 12, fire up a terminal (Ctrl+Alt+t) and execute the command(s) -
sudo apt-get install vlc
=========================================================================================================================================================
#3. Install Chromium or Google Chrome
chromium-browser
Firefox is installed by default but even if you use firefox as primary browser, sometimes you may need a secondary browser – then Google Chrome or Chromium seems to be a good alternative. Try Chromium or install Google Chrome on Linux Mint.
To install chromium, execute -
sudo apt-get install chromium-browser
Here is the detailed description about installing Chrome on on Linux Mint 12.
=========================================================================================================================================================
#4. Install Audacious Music Player
audacious on Linux Mint
Audacious is a simple and easy to use – cool music player. To install audacious, type -
sudo apt-get install audacious
=========================================================================================================================================================
#5. Install New Gnome shell themes
Gnome shell Themes for Linux Mint
Linux Mint 12 has Gnome Tweak Tool, installed by default, which allow you to configure advanced options for Gnome Shell desktop as well as for managing themes. To install icons, simply put the icon theme(downloaded packages) to ~/usr/share/icons directory. I’ve already covered a detailed post about installing Gnome Shell Themes on Linux Mint 12. (So you are supposed to refer the link)
=========================================================================================================================================================
#6. Install Ubuntu One
ubuntu-one in Linux Mint
Ubuntu One is a Dropbox like backup solution and the free plan offers 5GB storage which may be sufficient for a lot of users. Ubuntu One is well integrated with nautilus and so it will allow you to backup more easily. So whether you’ve used it earlier in Ubuntu or not, you should give it a try.
To install Ubuntu One execute following commands -
sudo add-apt-repository ppa:ubuntuone/stable
sudo apt-get update
sudo apt-get install ubuntuone-control-panel-gtk ubuntuone-client
=========================================================================================================================================================
#7. Configure GRUB options
grub-customizer
To customize grub menu or configure boot options there are two popular applications – startup manager (simple and easy to use) and second one is grub customizer (it has a lot of features and options).
customizing-grub-menu
Installing grub customizer,open terminal and execute -
sudo add-apt-repository ppa:danielrichter2007/grub-customizer
sudo apt-get update
sudo apt-get install grub-customizer
On the other hand if you want to try startup manager, then execute -
sudo apt-get install startupmanager
=========================================================================================================================================================
#8. Install Ubuntu Software Center
ubuntu-software-center
If you have used Ubuntu Software Center in Ubuntu 11.10 or 11.04, then you might have noticed that on Linux mint there is another programs installed by default, for managing applications. Software Manager is the default program for installing/removing applications in Linux Mint, Synaptic Package Manager is also there. If you are missing some of the cool features of USC then you can install that in one simple command -
sudo apt-get install ubuntu-software-center
=========================================================================================================================================================
#9. Try MATE if you don’t like Gnome Shell
Gnome Classic - MATE
If you don’t like Gnome Shell interface, with a bunch of cool extensions then MATE is probably for your – for Gnome 2 lovers. MATE is a fork of Gnome 2 project, it looks very similar to Gnome 2.3 desktop. You can see (above screenshot of MATE) the Gnome 2 style menu in Top left corner of the screen – appears like Gnome 2. It’s installed by default – just logout from the current session and select Gnome classic (with or without effects, whatever suits your computer hardware).
=========================================================================================================================================================
#10. Install Bleachbit to clean up
Bleachbit is equivalent to CCleaner(of Windows). It will allow you to remove/delete unnecessary files from your computer, in a couple of clicks. To install bleachbit, simply execute the command -
sudo apt-get install bleachbit
Monday, 27 January 2014
Android OS
Did you know you can have an android OS on your PC. When I say an OS i mean you can boot from android and use it as the your PC's OS. This is not an emulator like bluestacks.
It is simple:
 First you wil have to get and image of the prefered OS from https://code.google.com/p/android-x86/downloads/list
If you are running on linux, it is simpler, just use the startup disk creator to create a
bootable pen drive of the image.
For windows you will need to download a tool to enable you do that. you can you Universal USB Disk creator.
Have fun...Good Luck
It is simple:
If you are running on linux, it is simpler, just use the startup disk creator to create a
bootable pen drive of the image.
For windows you will need to download a tool to enable you do that. you can you Universal USB Disk creator.
Have fun...Good Luck
Saturday, 18 January 2014
How to make a USB Drive Bootable
Using your PC using Windows based OS (Vista or higher), open Command Prompt
- Type "diskpart" to open the disk partitioning software. Accept the UAC security prompt, if asked.
- Insert the USB drive.
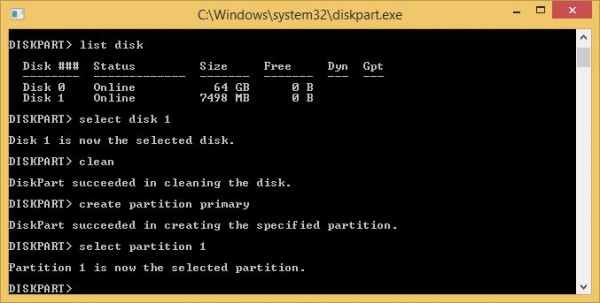
- Type "list disk". The program will then show you a list of all the physical drives (HDD, SSD, USB, etc.) that are attached.
- Identify the disk number of the USB drive (it can be recognized by looking at the size column; it's usually the last listed disk) and type "select disk X", where "X" is the disk number of your USB drive.
- Type "clean". This will erase the contents of the USB drive, so make sure you have the contents backed-up beforehand.
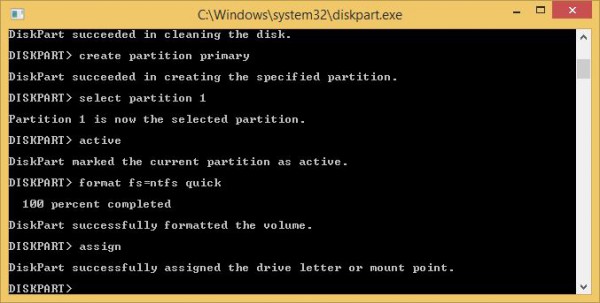
- Type "create partition primary". This command will create a primary partition on the USB drive.
- Type "select partition 1". This command will select the created partition.
- Type "active". This command will make the selected partition active.
- Type "format fs=ntfs quick". This command will format the created partition as NTFS.
- Type "assign". This command will assign a letter to the USB drive, which will make it show under Windows Explorer.
- Copy the contents of the Windows DVD or ISO from the created folder on the USB drive. this will work on windows vista,7,8 and 8.1. Good Luck
Subscribe to:
Posts (Atom)